

These 5 DIY kitchen ideas run from a half-hour screwdriver job to an afternoon with a saw and wood glue, and the right one depends on whether your problem is missing storage, lost counter space, or both.
A rolling cart with locking wheels covers the first for cheap at most home stores; a custom drawer organizer built to your exact inside width fixes the second, though only if you measure past the nominal size stamped on the front.
[link-whisper-related-posts]1. Rolling Cart
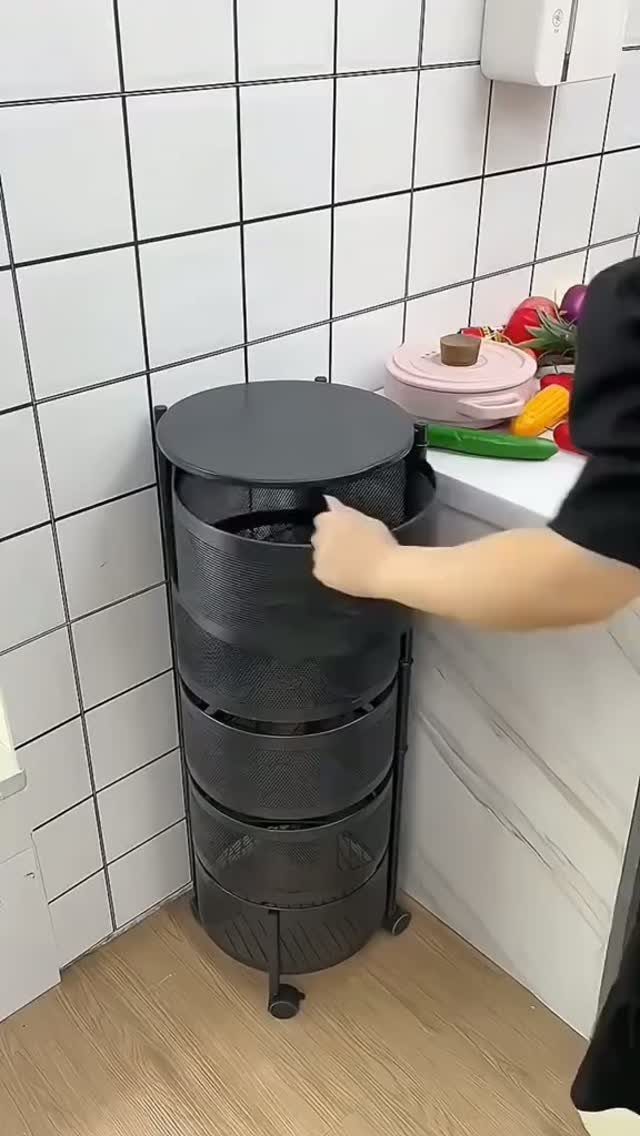
A rolling cart turns any corner into storage that moves where you need it. A black metal frame with swivel baskets sits tight against tile and rolls out when you need prep space or pantry overflow back.
I would look for canvas baskets and chalkboard labels if you want to sort snacks from produce without rooting through tiers.
Multiple levels hold the usual suspects, though a slimmer cart works fine in a galley kitchen where it needs to tuck under counters.
The whole thing runs cheap at most home stores, and assembly takes about half an hour with a screwdriver. Wheels lock, which matters on tile or when kids are around.

Reinforced Heavy-Duty Load Capacity: Built with a reinforced metal frame, this 3-tier rolling cart supports up to 66 lbs total (22 lbs per tier), providing stable and reliable storage for daily household and office use without bending or wobbling

[Multi-Room Rolling Storage Cart] One cart, endless uses: a kitchen storage cart for coffee supplies and snacks, a laundry cart for cleaning essentials, a bathroom organizer for toiletries, or a bedside cart in the bedroom. This rolling cart with wheels adapts to any room and routine

Reinforced All-Metal Construction, Ultra-Sturdy: Our patent-pending frame geometry combines optimized weight distribution with premium materials to ensure the rolling metal cart moves easily without wobbling when loaded up to 110 lbs
2. DIY Spice Rack
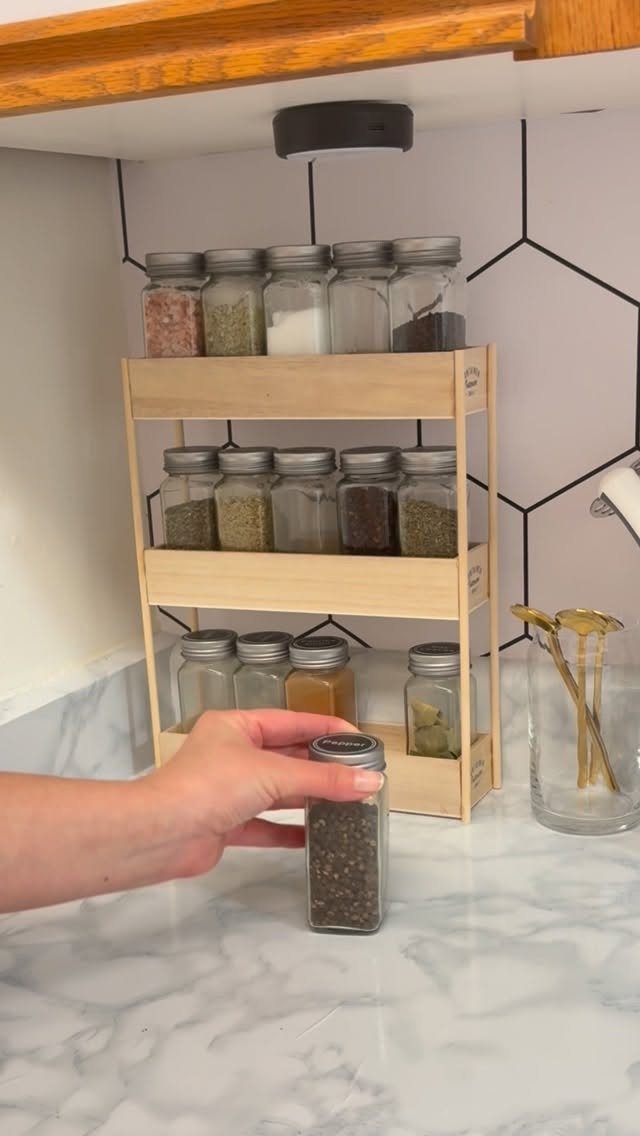
Spice racks that live inside cabinet doors keep counters clear and jars findable. A three-tier wooden version sits on marble, but the same build mounts to a door panel with two screws and a cleat.
A pull-out version slides into that awkward 3-inch gap beside the fridge or stove, which is where I would put it if counter space is already gone.
Either build needs a saw, wood glue, and an afternoon. Sand before assembly; spice dust finds every rough corner.
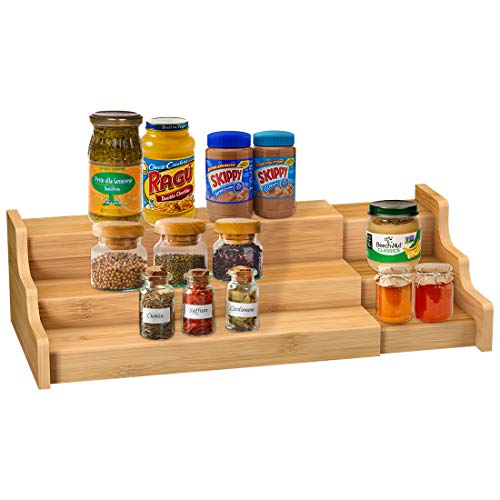
How to use: Please put the spice rack organizer horizontally in cabinet, the depth of shelves is from 2.28 to 2.56 inch, fits most of spice jars. Don’t put it vertically

Durable and Natural: Made of natural bamboo, this spice rack organizer is stronger and more sustainable than hardwood and plastic cabinet organizers.

VERSATILE STORAGE: This 3-tier wooden step shelf provides ample storage space for spice bottles, jars, seasonings, and baking supplies in your kitchen pantry or cabinet.
3. DIY Drawer Organizer
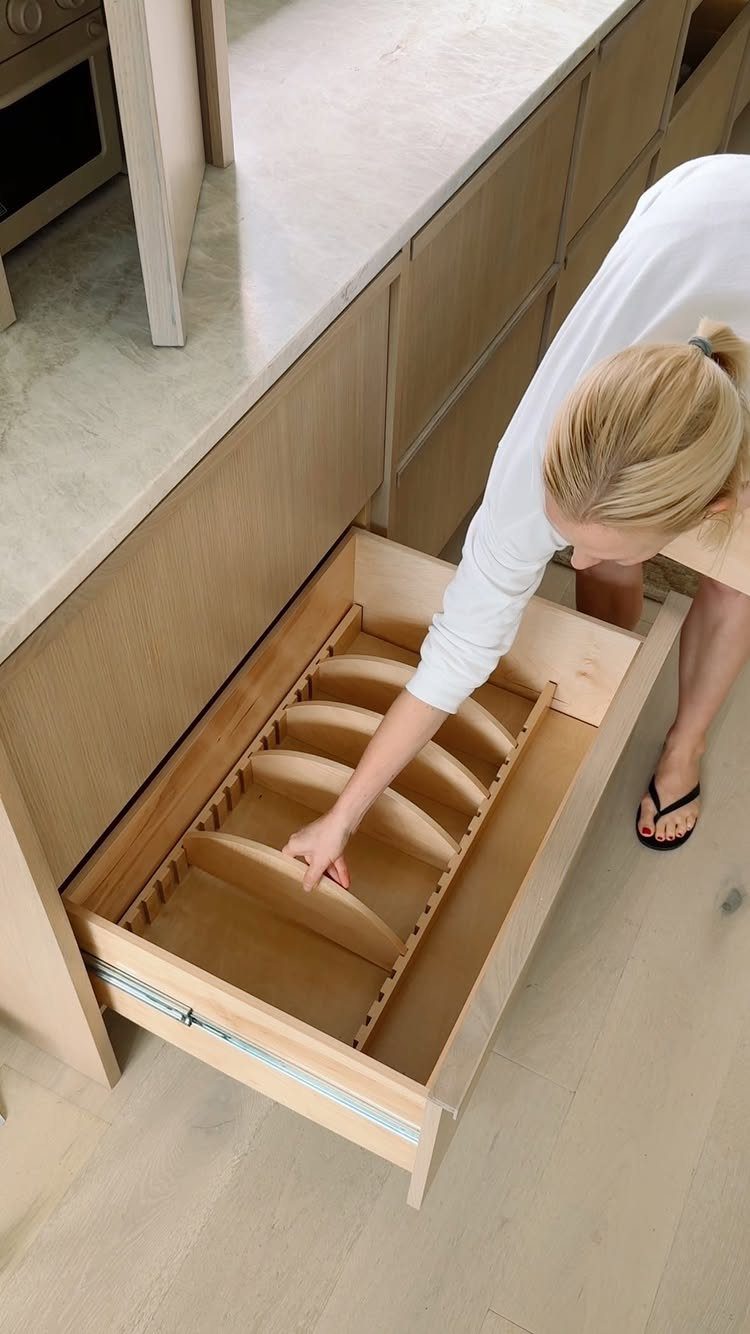
Curved wooden dividers slot into a base that fills the drawer box exactly, so nothing shifts when you yank it open. The whole system was built to this drawer’s width, not bought off a shelf.
Dowels or thin plywood strips work for utensil slots.
For the plastic container nightmare, vertical dividers corral lids and base pieces nest in front. I have seen old drawer boxes salvaged for this, but new thin plywood cuts cleaner and lasts.
A table saw helps, but a circular saw and careful measuring gets it done. Materials for a standard drawer run cheap if you cut the pieces yourself.

【Large Capacity】Compared with most products on the market, our spice rack has a larger capacity and two different sizes to meet your different needs. There are a total of 6 separate shelves, which can not only place 90 4OZ seasoning jars, 81 6OZ seasoning jars, or 72 8OZ seasoning jars, but also big bottles and cans. All items are arranged neatly and clearly, make your kitchen look neater

Durable 4 pack Spice Rack: Built with sturdy powder-coated metal, this wall mount rack won’t bend or warp under long-term heavy loads. It stays rigid in humid kitchens and with everyday use, free from sagging or deformation. Ideal for home and commercial spaces alike.

Clear Spice Rack: Made of durable ABS material, this wall mounted spice rack is sturdy and highly transparent, allowing you to easily see and access spices jars.
4. Magnetic Knife Holder
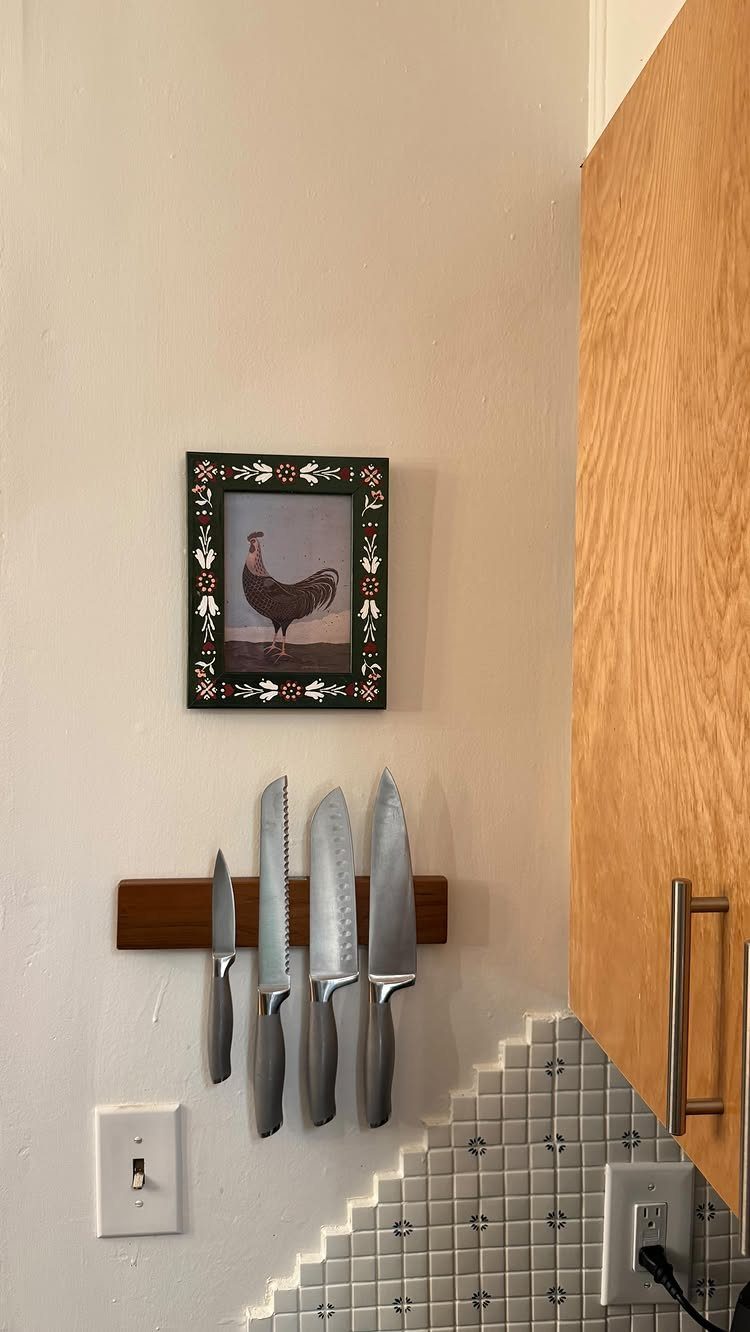
A magnetic strip on the wall holds knives where you can see the blade shape and grab without tipping a block over.
A wooden version mounts under a rooster print; reclaimed lumber gives the same look for scrap cost if you have a source.
A magnetic knife holder‘s magnet strength matters more than it looks like it would; magnets that grip the blade flat can nick with time.
Drill straight, glue the magnets, and seal the face with food-safe oil.
Install at arm height, clear of the stove’s grease zone. One strip holds four knives comfortably; two strips handle a full set.

PERFECT SIZE OF 13” BY 17”: We highly recommend to measure your drawer before order. This drawer organizer will fit perfectly in your 13" wide drawer.

🌿 𝐄𝐗𝐏𝐀𝐍𝐃𝐀𝐁𝐋𝐄 𝐓𝐎 𝐅𝐈𝐓 𝐌𝐎𝐒𝐓 𝐒𝐓𝐀𝐍𝐃𝐀𝐑𝐃 𝐊𝐈𝐓𝐂𝐇𝐄𝐍 𝐃𝐑𝐀𝐖𝐄𝐑𝐒: Our deep bamboo drawer organizer is ideal for saving kitchen storage space, thanks to its adjustable storage drawers that expand from 17”x13” to 17x19.6” wide with 1.9” deep slots. Easy to use and ideal for helping to maximize kitchen storage space, simply pull apart from the sides for additional storage space and a more secure fit for wider drawers. Different sized compartments allow for standard silverware and large utensil placement

INSTANT ORGANIZATION: Easily store and organize socks, leggings, sports bras, yoga pants, lingerie, underwear, tights, t-shirts, scarves, belts, accessories, jewelry, and more; The dividers expand to desired length and lock into place to keep clothes situated; Customize dresser drawers to perfectly fit your storage needs with these spacers; Keep clutter under control with separators; Set of 4
5. Pegboard Wall Organizer
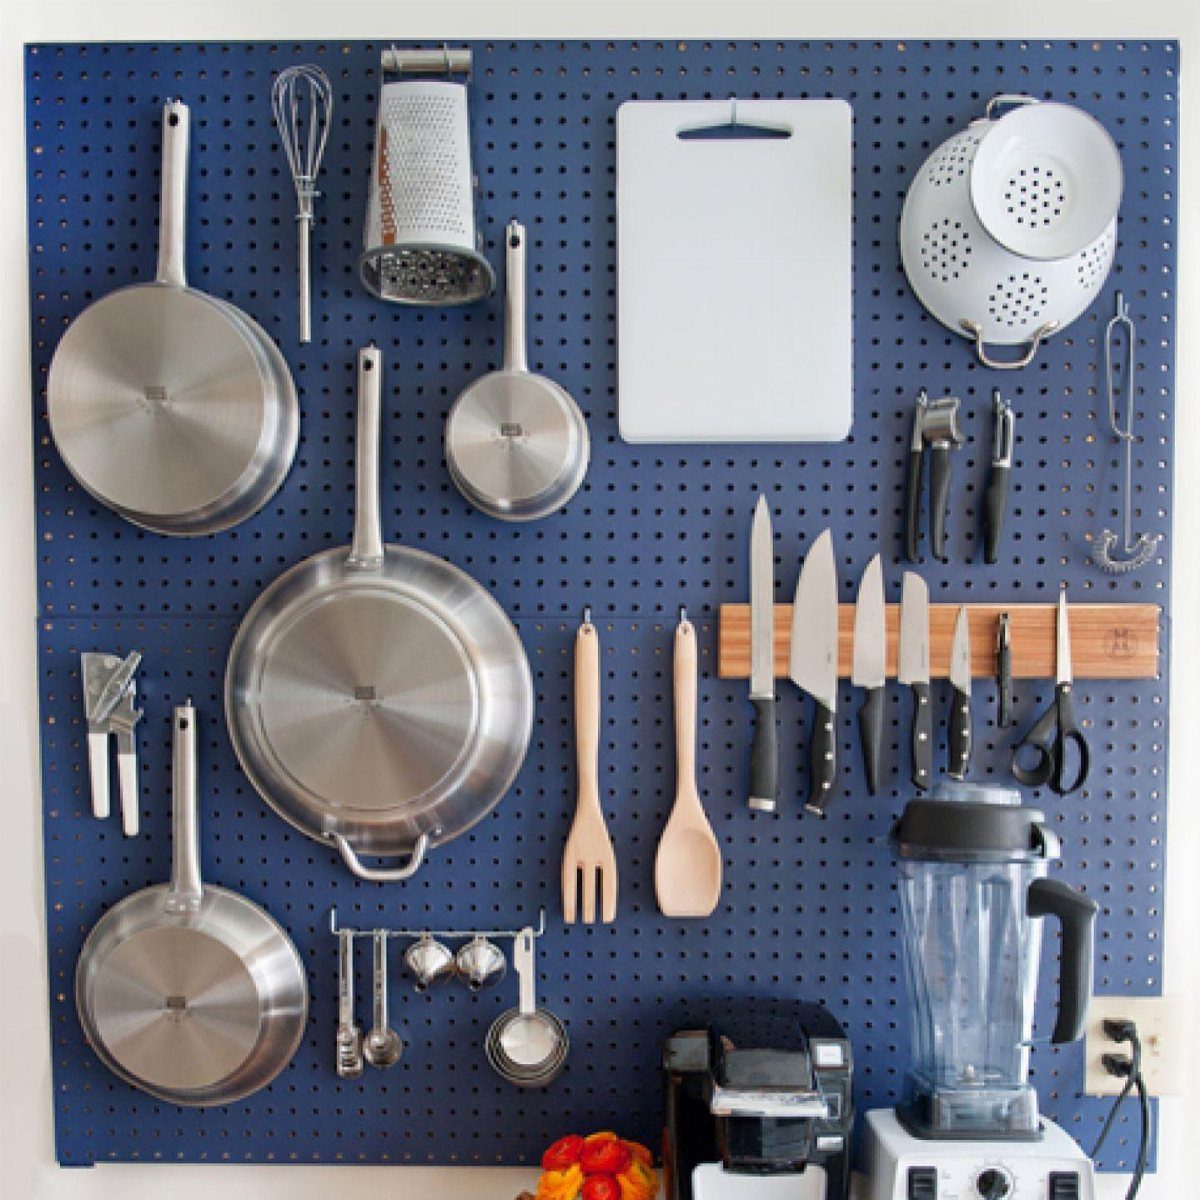
Pegboard on a blank wall turns vertical space into anything you can hang. A pegboard panel holds pans, a colander, a cutting board, and a magnetic bar for knives, all on hooks that move when your collection changes.
Standard pegboard holes are spaced close together; buy hooks rated for cast iron if you cook with it. Paint the board before hanging, or buy prefinished in a color that reads as intentional against your wall.
A modest panel covers most needs and costs little with hardware.
Mount to studs; a loaded board with 3 All-Clad pans pulls hard. I would leave enough clearance to the counter below for swinging lids.

Heavy Duty and Solid magnetic knife holder: Our magnetic knife holder for refrigerator contains powerful magnets and has an extremely strong grasp for holding kitchen knives, utensils securely and evenly. Best knife magnet strip with no risk of the knives falling off, even for heavy cleaver and knives with heavy handles. Great magnetic knife holder for fridge to help with kitchen organization and storage. Not compatible with non-austenitic stainless steel or other non-magnetic materials. Please test your knives with a magnet before purchase.

★Powerful Magnetic Knife Bar: This modern magnetic knife bar is made from strong magnets and covered in elegant, satin finished, high grade stainless steel, accenting any kitchen décor.

【Acacia Wood & Super Strong Magnet】HOSHANHO magnetic knife strip is made from top-quality acacia wood and built-in two rows of powerful magnets running through the entire strip, stronger adsorption force allow even your largest knives to hang safely and securely, ultra sturdy and easy to clean up.
Maximizing Small Spaces
Vertical space above eye level is the easiest square footage to waste. Ceiling-high shelving needs a step stool, but it handles the holiday roasting pan you touch twice a year without clogging the drawer below.
Over-the-door racks and adhesive hooks fit spots no cabinet reaches: the back of the pantry door for aprons, the side of the fridge for a slim organizer.
Clear containers help you see when the cumin is almost gone before you start the recipe. That uniformity also lets you stack higher without the leaning-tower-of-cans problem.
Multi-purpose pieces matter most when the floor plan is tight.
The rolling cart in the list moves, but it also disappears when you need the walkway back. Every choice trades footprint for function; the hard part is picking which function you need that month.

Perfect Dimensions for Versatile Use: Measuring 16.92" (L) x 11.81" (W) x 33.85" (H), this 5 - tier storage cart is designed to fit seamlessly into various spaces in your home. Each single basket has a height of 3.93", providing an ideal size for different items. Note that Installation step 1 requires a hammer (not included with the product).

【Stable & Sturdy Construction】Compared with ordinary storage carts, our rolling storage cart is made of more high-quality and thick steel, which promised stable and sturdy, it can hold up to total 150lbs. Rust-resistant powder coating makes it durable.

Reinforced All-Metal Construction, Ultra-Sturdy: Our patent-pending frame geometry combines optimized weight distribution with premium materials to ensure the rolling metal cart moves easily without wobbling when loaded up to 110 lbs
Budget-friendly DIY Projects
IKEA runs a pantry build under $200 if you shop their storage line carefully.
That figure covers wire baskets, shelf units, and the bins to sort pasta from baking supplies. It assumes you already own the basic tools and the time to assemble flat-pack pieces.
Plywood and thin wood strips from any home center run cheaper than finished kits, though they need cutting and sanding.
The spice rack, drawer organizer, and magnetic holder all start with raw lumber or a reclaimed piece if you have a source.
Paint is where you spend or save. Prefinished pegboard costs more than raw; a quart of cabinet paint and a roller covers the difference if you do not mind the drying time.
Hardware-store casters under a self-built cart cost less than factory-installed, but check the weight rating. Cheap wheels flatten under a loaded mixer.

Adjustable Spice Shelf: Size 12.70~22.20”W * 7.70”D * 4.30”H, the wooden spice rack can be expanded from 12.70 to 22.20 wide that fits your space and needs

This detachable spice rack for cabinet allows easy assembly and disassembly in 2 minutes—no complex tools required. As a practical spice organizer for cabinet, it fits perfectly into standard-sized kitchen cabinets without wasting extra space.
Repurposing Old Furniture
Old drawer boxes can become the base of a custom organizer if the dimensions match yours. The wood is already dry and stable, though planed edges and fresh plywood cut cleaner for slots that need to stay tight.
Reclaimed lumber for a magnetic knife strip takes more prep: check for hidden nails, plane flat, and seal with food-safe oil before the magnets go in.
The look is worth the extra hour if you like visible grain, but scrap cost only beats new lumber if you already have a source. Driving to 3 yard sales for a free board spends the savings in gas.
Any repurposed piece needs honest assessment of its joints and finish.
A wobbly chair back will not steady up as a pot rack without more bracing than the project calls for. Factor that time in, or the sustainability win becomes a half-finished corner pile.
Easy DIY Skills
The saw can be a hand saw if you are patient; a circular saw speeds the drawer organizer and any plywood ripping.
Wood glue matters more than clamps for small pieces, though painter’s tape works as a third hand while it sets.
Measuring is the skill that saves material.
Cut the drawer organizer’s base to the drawer’s width, not the nominal size printed on the front. Inside dimensions vary by a quarter-inch more often than you would expect, and a loose organizer shifts every time you pull.
Drill straight for the magnetic strip; a pilot hole angled even slightly shows through the face.
Sand before assembly, not after. Spice dust and kitchen grease find every rough corner and every gap, and cleaning inside a built box is nearly impossible.
Most of these builds run an afternoon from lumber pile to installed. The rolling cart is faster if you buy the frame; the drawer organizer is slower if you fuss with curved dividers.
Start with the spice rack. Two cuts, two screws, and you have the confidence to measure the next one tighter.